Welcome to the next phase of your Luxpeer journey: managing your dashboard profile. With your account successfully registered, it’s time to harness the power of your Store Dashboard to create a compelling online presence. This comprehensive guide will walk you through the various features and functionalities of the dashboard, enabling you to optimize your profile, manage your shop effectively, and ultimately, drive sales and growth. From customizing your storefront to analyzing performance metrics, we’ll cover all the essentials to help you excel in Luxpeer’s vibrant community of artists and vendors. Let’s dive in and explore the world of possibilities that awaits you!
To access your dashboard, firstly, you need to login or to register. The link to tutorial how to login or register your Vendor’s account is here.
Your Luxpeer Dashboard
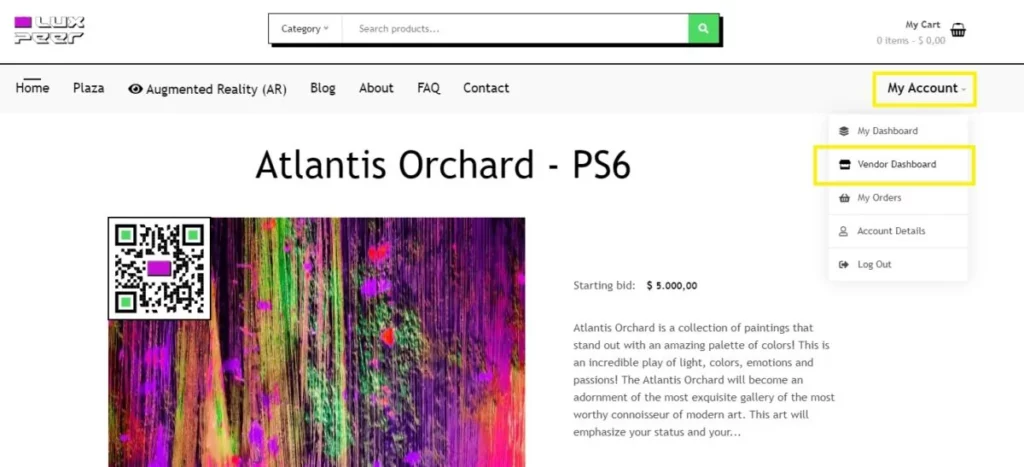
To access your “Vendor Dashboard,” hover your cursor over the “My Account” option located in the top right corner of the Luxpeer website. From the dropdown menu, click on “Vendor Dashboard.” This dedicated area is designed to provide you with all the tools and resources needed to manage your shop efficiently and effectively.
In your Vendor Dashboard, you’ll have the flexibility to post your artworks and sell them directly to customers or even offer them up for auction. This versatility allows you to choose the selling method that best suits your creative offerings and target audience, ensuring you can make the most of the opportunities Luxpeer provides.
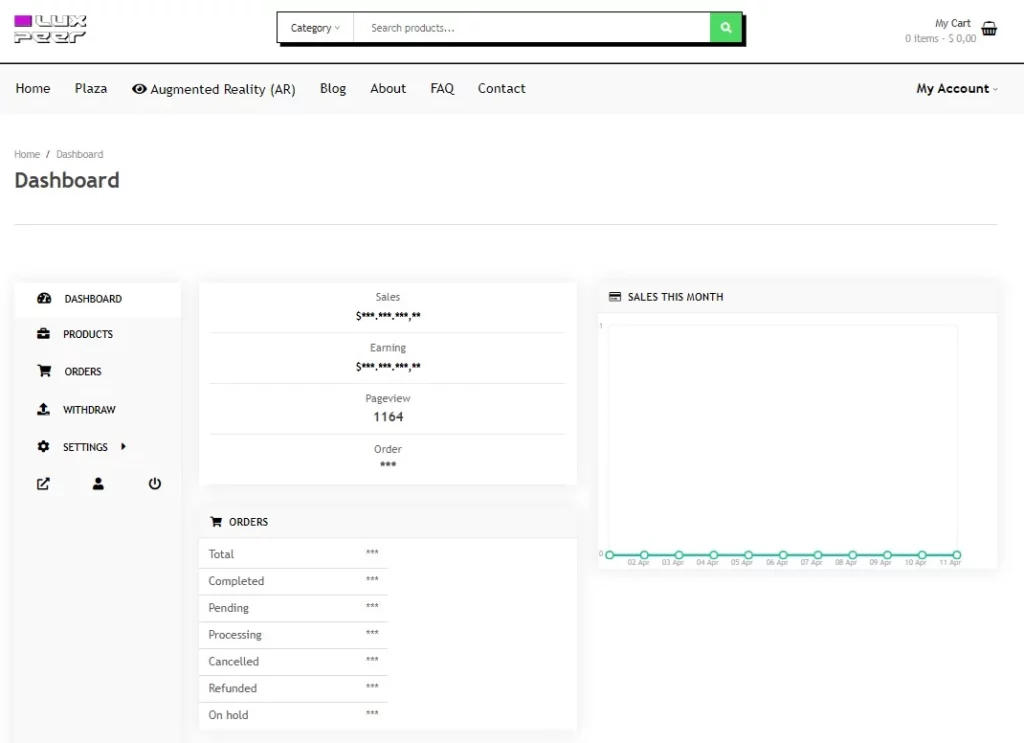
The Vendor Dashboard on Luxpeer is your central hub for managing all aspects of your online shop. Its user-friendly layout features quick access to essential tabs like Dashboard, Products, Orders, Withdraw, Settings, Store, and Payment. You can track your sales, earnings, pageviews, and order statistics, all in real-time. Additionally, it provides you with a detailed overview of your order statuses, such as completed, pending, processing, cancelled, refunded, and on hold. This comprehensive dashboard offers you full control over your store, making it easy to monitor performance, adjust settings, and ultimately, grow your business on Luxpeer’s thriving platform.
Products
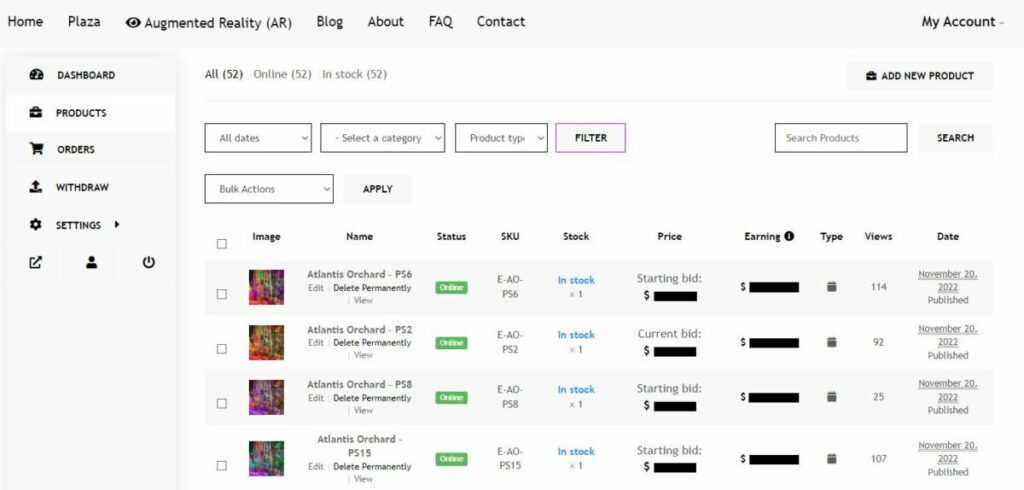
The “Products” menu in your Vendor Dashboard is designed to make managing your offerings a breeze. It allows you to view and organize your products based on categories like All, Online, and In-stock, ensuring that you have a clear overview of your inventory at all times.
To further refine your product listings, you can use the following filters and tools:
- All dates: Filter your products by the date they were added or modified.
- Select a category: Sort your products based on the specific category they belong to.
- Product type: Filter items by their type, such as digital or physical products.
- Search Products: Quickly find specific products using the search bar.
- Select bulk action: Perform bulk actions on multiple products at once, such as updating stock or modifying prices.
- Bulk Actions: Choose from a list of actions to apply to the selected products.
Your products will be displayed in an organized table format, including relevant details like Image, Name, Status, SKU, Stock, Price, Earning, Type, Views, and Date. This comprehensive overview allows you to monitor and manage your inventory with ease.
To add a new product to your store, simply click on the “Add new” button located in the top right corner of the Products menu. This will guide you through the process of creating and customizing your product listings, ensuring your online shop remains fresh and appealing to Luxpeer’s vibrant community of art enthusiasts and buyers.
How to create an manage your product can be found in an article: “How to manage your product“
Add new product to Luxpeer
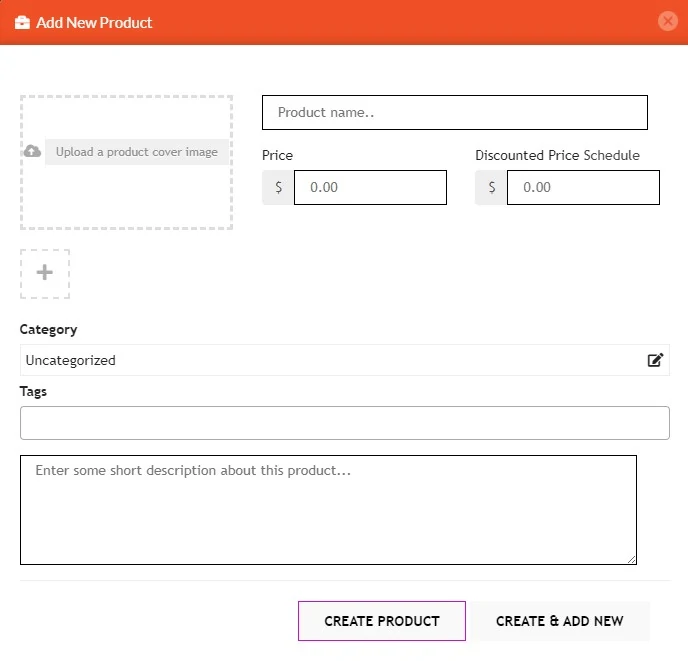
Adding a new product to your Luxpeer shop is a straightforward process designed to showcase your artwork effectively. Follow these simple steps to create a captivating product listing:
- Upload your photo(s): Start by uploading high-quality images of your artwork. You can add multiple photos to provide potential buyers with various angles and detailed views of your creation.
- Product name: Give your product a unique and descriptive name that captures the essence of your artwork and appeals to your target audience.
- Price: Set the price for your artwork in USD. Consider factors such as materials, time spent creating the piece, and the current market value of similar works to determine a fair price.
- Discounted Price Schedule: If you wish to offer a discount on your artwork for a limited time, enter the discounted price here. You can also set up a schedule for when the discount will be active.
- Category: Choose a relevant category for your artwork from the available options. This will help potential buyers find your product more easily when browsing the Luxpeer platform.
- Tags: Add tags that represent key aspects of your artwork, such as style, medium, subject, or theme. Tags make it easier for users to discover your work through search and filters.
Short description:
Write a concise and engaging description of your product. Highlight the unique features, techniques, or inspiration behind your artwork to capture the attention of potential buyers and encourage them to explore your shop further.
Once you’ve completed these steps, your new product listing will be ready to go live on Luxpeer. Showcasing your creative talent to our global community of art enthusiasts and collectors.
The two options for adding products to your Luxpeer store. “Create New” and “Create & Add New,” provide different ways to manage your product listings:
- Create New: This option completes the process of adding the current product to your store. After clicking this button, your product is saved and added to your inventory.
- Create & Add New: This option not only saves and adds the current product to your store but also opens a new window for you. To immediately start creating another product listing. This is particularly useful when you want to add multiple products in a row without returning to the main Products menu.
Choose the option that best suits your workflow and efficiently manage your product listings on Luxpeer.
Editing your artwork on Luxpeer
When you open the product, you can edit all the important information about your art. We will explain the main differences and what they mean.
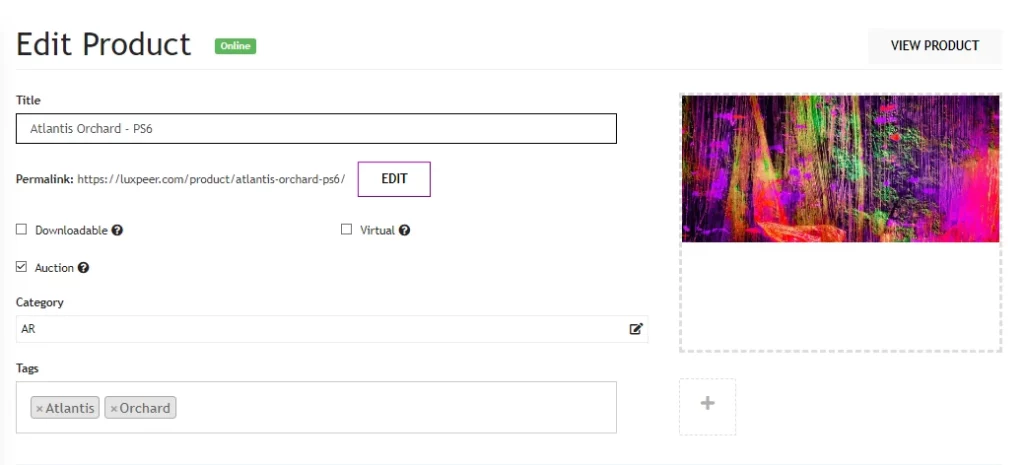
On the right side of your product you can change or edit the main photo of your artwork or add additional ones. On the name you can edit the title of your product and the permalink. A clear and concise permalink enhances search engine optimization and improves the accessibility and shareability of the product page.
Now there are three checkmark icons that are really important:
- Downloadable: Selecting the “Downloadable” checkmark allows you to offer products that grant customers access to a file or digital content upon purchase. This is particularly useful for selling electronic art or any other type of digital media that customers can download and use after completing the purchase.
- Virtual: Choosing the “Virtual” checkmark indicates that the product you are selling is intangible and does not require physical shipment. Virtual products are delivered electronically or accessed online. By selecting this option, customers understand that they will receive the product without the need for physical delivery.
- Auction: Enabling the “Auction” checkmark allows you to turn the current product into an auction item. This feature provides an exciting opportunity for potential buyers to bid on the product, competing with others to secure the highest offer. By enabling auctions, you create a dynamic and interactive environment where interested buyers can participate and potentially acquire the product at the highest bid price. If this icon is left unchecked, you will need to add only the final price.
In the “Category” tab, you have to select to which category your product will apply. For this case, the category for “Atlantis Orchard – PS6” is AR. Don’t forget to add tags.
Describing your artwork
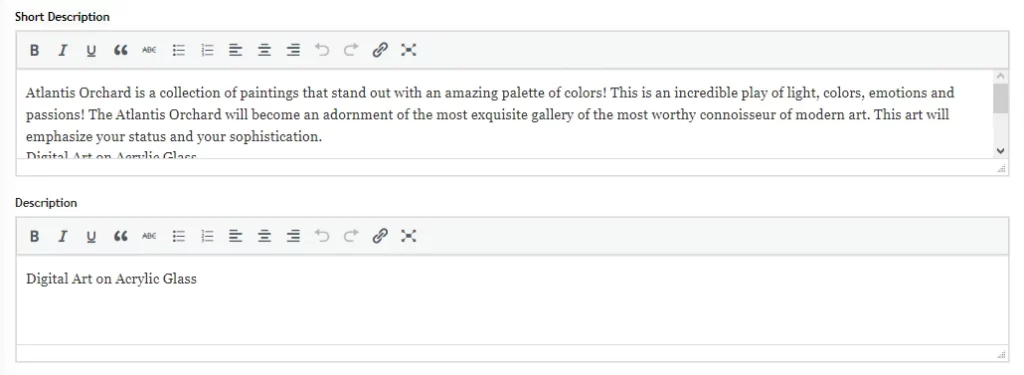
Having a good Short Description and Full Description is crucial for capturing the attention and interest of potential buyers.
The Short Description, displayed next to the product image, provides a concise and enticing summary. It should highlight key features and unique selling points to entice users to click and explore further.
The Description, located at the bottom of the product, offers a chance to provide a comprehensive overview. Use the text editor to create a detailed narrative about the product, including specifications, benefits, and usage instructions.
The text editor allows you to format the text, use bullet points and headings for better readability. Utilize this tool to create visually appealing descriptions that are easy to read.
Remember, a well-crafted Short Description and Description can significantly impact buyers’ perception and decision-making process, increasing the likelihood of a purchase. Moreover, invest time in creating compelling descriptions to maximize the effectiveness of your product listings.
Inventory
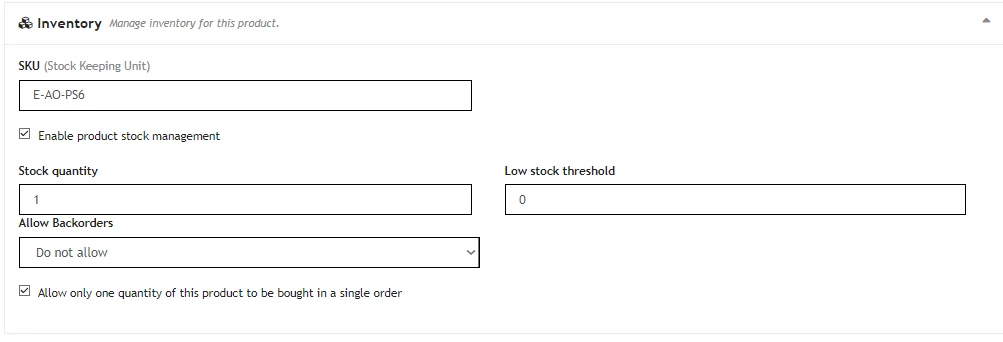
Inventory management is essential for effective product control and availability. Here’s a breakdown of the inventory-related options and their purposes:
- SKU (Stock Keeping Unit): The SKU is a unique identifier assigned to each product variant, allowing for easy tracking and management of inventory.
- Enable Product Stock Management: Enabling this option allows you to track and manage the stock quantity of the product.
- Stock Quantity: This field indicates the current quantity of the product in stock. Update this number as inventory levels change to accurately reflect availability.
- Low Stock Threshold: Set a specific threshold number to receive a notification when the stock quantity falls below that threshold. This helps you stay aware of low stock levels and take appropriate actions to replenish inventory.
- Allow Backorders: Choose from the dropdown menu options to determine how backorders (orders for out-of-stock items) are handled. Select “Do not allow” to prevent customers from placing orders when the product is out of stock. Choose “Allow but notify customer” to permit backorders and inform customers about the delay. Alternatively, select “Allow” to accept backorders without notifying customers.
- Allow Only One Quantity of This Product to Be Bought in a Single Order: By enabling this option, customers will only be able to purchase one unit of the product in a single order. This can be useful for products with limited availability or when you prefer customers to make separate orders for larger quantities.
By effectively managing inventory, utilizing SKUs, setting stock quantities, defining low stock thresholds, and handling backorders appropriately, you can ensure accurate stock control and provide a smooth purchasing experience for your customers.
Other options
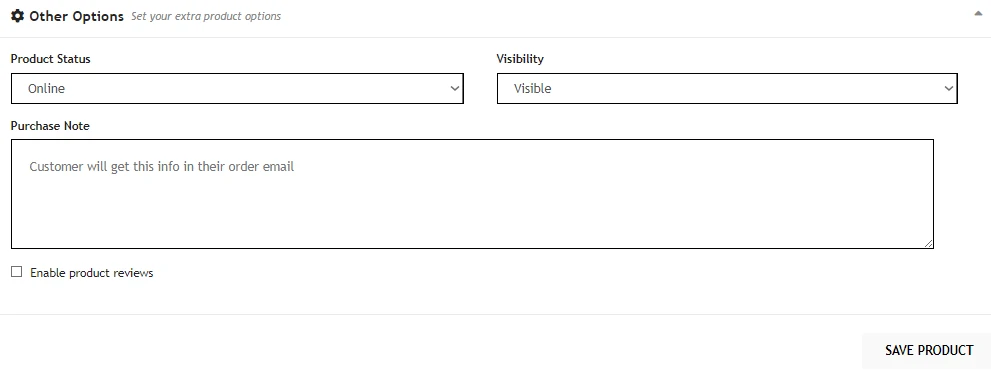
Configure additional product options with the following guidance:
- Product Status: Choose between “Online” or “Draft” from the dropdown menu to determine the visibility and availability of the product. Select “Online” to make the product accessible to customers, while “Draft” keeps it unpublished and hidden.
- Visibility: Select from options like “Visible,” “Catalog,” or “Hidden” in the dropdown menu to control where and how the product appears on your website. “Visible” ensures the product is visible to customers, “Catalog” limits visibility to catalog pages, and “Hidden” conceals the product from public view.
- Purchase Note: Add relevant information in the Purchase Note field. This note will be included in the order confirmation email sent to the customer, providing them with additional information or instructions related to their purchase.
- Enable Product Reviews: Activate the checkmark icon to enable customer reviews for the product. This feature allows customers to share their feedback, enhancing the credibility and trustworthiness of the product.
By utilizing these other options, you can effectively manage the visibility, status, and information associated with the product, while also enabling customer reviews to further engage with your audience and enhance their shopping experience.
When you finish editing your product, just click on “Save Product” and all the changes will apply.
Withdraw from Luxpeer
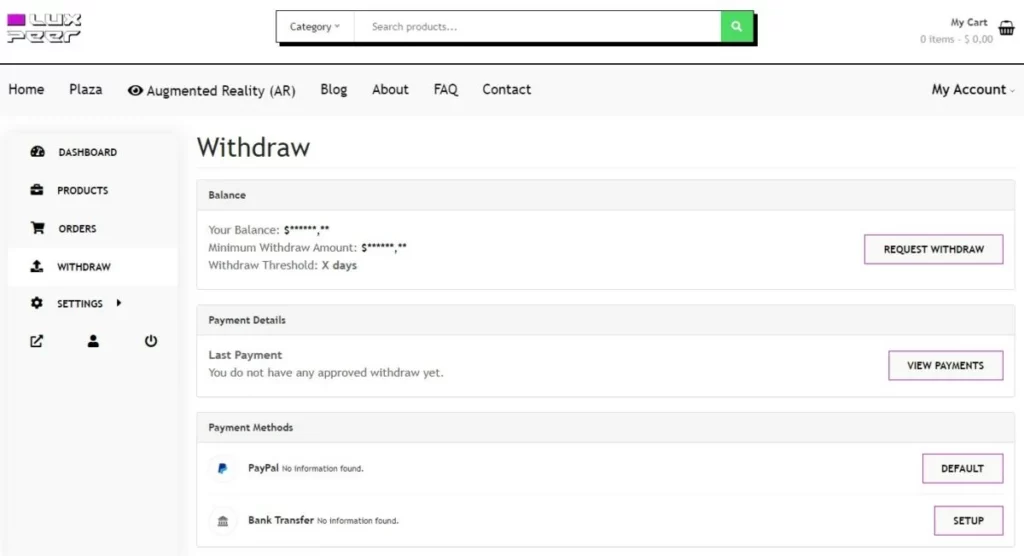
The Withdraw menu in your Vendor Dashboard allows you to manage and monitor your earnings on Luxpeer. Here’s a brief overview of the key features:
- Balance: This section displays your current account balance in USD. It shows the total amount you’ve earned through your sales on Luxpeer.
- Minimum Withdraw Amount: The minimum amount you need to have in your account balance before you can initiate a withdrawal.
- Withdraw Threshold: The specific number of days (X days) you need to wait between withdrawal requests.
- Payment Details: This area provides information about your last approved withdrawal, including the date and amount.
- Last Payment: If you haven’t made any withdrawals yet. You’ll see a message indicating that no approved withdrawals have been recorded.
- Payment Methods: This section lists the available withdrawal options, such as PayPal and Bank Transfer. You can view and manage your payment information associated with each method.
To withdraw your earnings, make sure you meet the minimum withdrawal amount and threshold requirements. Then, choose your preferred payment method and follow the necessary steps to complete the process.
Settings
The Settings menu in your Vendor Dashboard is divided into two submenus to help you efficiently manage your account information.
Store

In the “Store” settings you can edit your Store’s information. Whether you are an artist or a company. Here you can change your background, profile picture. How many products are shown in your store’s page. Also, it is the best if the store provides its address.
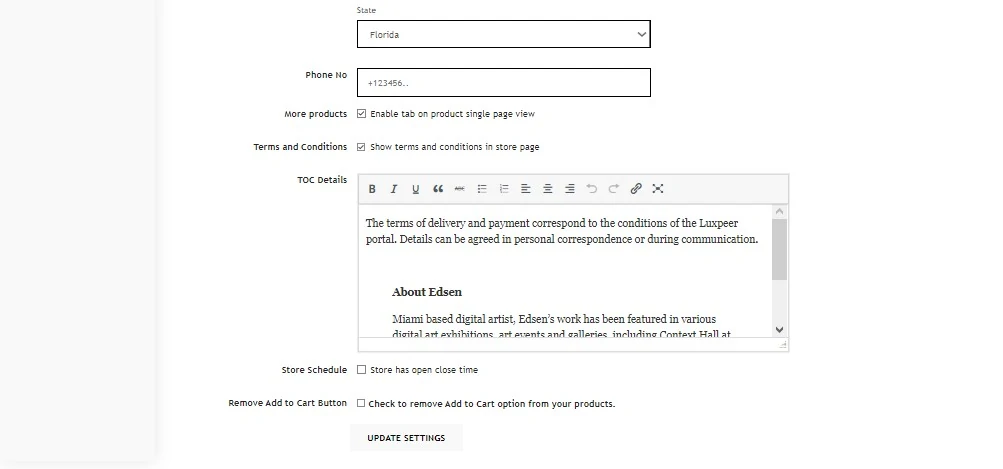
By scrolling to the bottom, the owner of the store can create and edit its “Terms and Conditions”. Here he or she explains how the transactions are made. The policy of the company and the terms of delivery etc. The information should be as informative as possible for the fewer issues in the future.
Store Schedule checkmark – is providing information when your store is working. If you click on the checkmark icon, you will need to provide an additional information what is the open hours of your store.
“Remove Add to Cart Button” icon means that your products will not have the ability to be added to Luxpeer cart. If the client wants to buy it, he needs to contact you by the provided information in your profile.
Once all the information is edited or created, click on “Update Settings” and your provided information will be saved.
Luxpeer Payment Methods
In “Payment Methods” selection, you can edit or add your payment information. This information can be provided when you are registering as a Vendor, but you can update or add new when you visit this menu.
Thank you for taking the time to read our comprehensive guide to managing your Vendor account on Luxpeer. We hope this manual has provided you with valuable insights and resources to enhance your experience on our platform. We’re excited to have you as part of our global community of talented artists and vendors and look forward to seeing your creativity thrive on Luxpeer. If you have any further questions or concerns, don’t hesitate to reach out to our support team for assistance. Thanks again for choosing Luxpeer!